Roadside Guitars now has a local Santa Cruz phone number. Please call (831) 824-4087 to get a hold of us!
Thanks,
-Ben & Matt
Saturday, December 12, 2009
Saturday, April 25, 2009
Ibanez CS-9 Speed Mod.
I found this mod on www.thegearpage.net. Here is a link to the seminal thread: www.thegearpage.net/board/showthread.php?t=471807.
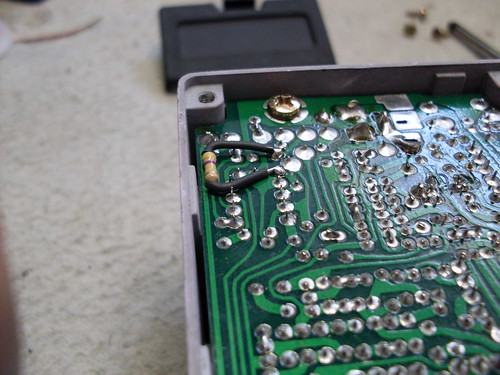
This modification works by adding a resistor to the underside of the circuit board in parallel with an already present resistor effectively dropping the original part value, and changing the circuit to allow faster rates, resulting in a pseudo rotary speaker type of sound at some settings.
I personally used a 470K resistor instead of the recommended 510K and it worked fine. There's a lot of hype surrounding this on the thread I linked to. It does give way to some pretty good rotary speaker-like sounds at the newly available higher speeds, but obviously still doesn't touch standing in front of a Leslie. I would say though, that this mod, being as simple and easily reversible as it is, is practically a must try for any CS-9 owner. Note that the slow speeds are still available.
What you need:
1. Soldering Iron
2. Solder
3. A 500K (approximate values are fine) 1/4 watt resistor
4. Electrical tape or heat shrink tubing
5. 5 minutes
What you do:
1. Pop open the pedal
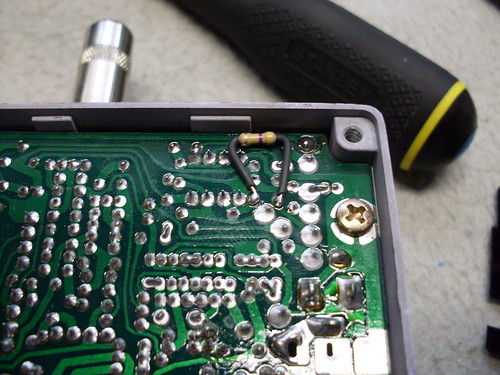
2. Locate the points you need to solder to (Look at the 2 photos below, larger photos are available on the Roadside Guitars Flickr. Double-clicking the photos here will take you there)
There are also more photos available on the previously mentioned thread.
3. Trim and heat shrink the legs of the new resistor (if you're using tape, wait until after you've soldered the resistor down, then just tape around the whole thing).
4. Solder that thing in there (it should look like the above photos), plug in and check to see that everything's working, and enjoy your new high speeds. The effect is particularly nice in stereo.
Good luck!
-Matt
This modification works by adding a resistor to the underside of the circuit board in parallel with an already present resistor effectively dropping the original part value, and changing the circuit to allow faster rates, resulting in a pseudo rotary speaker type of sound at some settings.
I personally used a 470K resistor instead of the recommended 510K and it worked fine. There's a lot of hype surrounding this on the thread I linked to. It does give way to some pretty good rotary speaker-like sounds at the newly available higher speeds, but obviously still doesn't touch standing in front of a Leslie. I would say though, that this mod, being as simple and easily reversible as it is, is practically a must try for any CS-9 owner. Note that the slow speeds are still available.
What you need:
1. Soldering Iron
2. Solder
3. A 500K (approximate values are fine) 1/4 watt resistor
4. Electrical tape or heat shrink tubing
5. 5 minutes
What you do:
1. Pop open the pedal
2. Locate the points you need to solder to (Look at the 2 photos below, larger photos are available on the Roadside Guitars Flickr. Double-clicking the photos here will take you there)
There are also more photos available on the previously mentioned thread.
3. Trim and heat shrink the legs of the new resistor (if you're using tape, wait until after you've soldered the resistor down, then just tape around the whole thing).
4. Solder that thing in there (it should look like the above photos), plug in and check to see that everything's working, and enjoy your new high speeds. The effect is particularly nice in stereo.
Good luck!
-Matt
Tuesday, April 7, 2009
Adding Tone Bypass to a NY Big Muff Reissue
My NY BMP Reissue was something I didn't think I'd end up tinkering with, sheerly because of sentimental value. It was the first pedal I bought when I was about 14, and I used it extensively at one point both live and on recording. I've always liked BMPs, particularly the late 70s - early 80s Muffs with tone bypass because I'm a midrange hungry player, and the BMP tone stack has a huge dip in the middle. So after a little deliberation, I convinced myself to open my pedal up and wire a in a tone bypass under the condition that I didn't do anything irreversible like drilling holes for new components. It's an immensely simple modification, and I ended up being very happy with the results, so I thought I'd share.
Note that you can double click any of the photos below and it will take you to the Roadside Guitars Flickr where you can see larger pictures.
What you need:
-Wire
-Solder
-Desoldering Braid
-Soldering Iron
-Needle Nose Pliers
-Heat Shrink Tubing
-SPST toggle switch (SPDT will both work fine, one contact will just be left unused.)
What you have to do:
Open up the pedal casing, remove knobs and nuts on pot shafts and flip circuit board over.
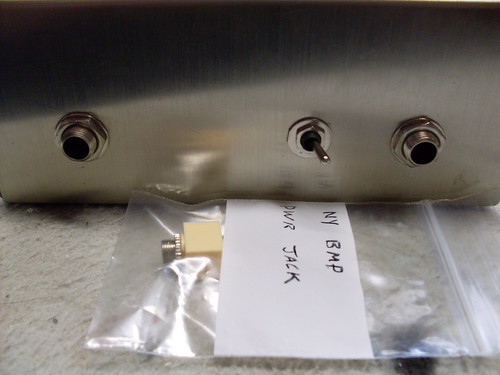
Either drill a hole for a switch somewhere or remove the 9V power adapter jack on the rear of the pedal (that's what I did so I wouldn't have to drill. The jack isn't worth much to me anyway since I generally prefer battery power. A sub-miniature, and possibly even a miniature switch will fit there perfectly). If you use the hole from the jack, just coil the wiring up, zip tie it or tape it, and tape around the jack itself just to make certain it doesn't short anything. I cut the jack out and tied the remaining wire off, because I can use the jack as a replacement part on other pedals.
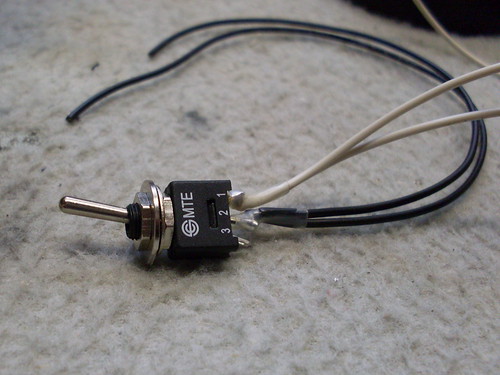
Wire Up the Switch: Solder two wires (I used 22 AWG stranded wire) to contact 1 and another two wires to contact 2. About 3 or 4 inches length is good. If you're using a sub-mini switch it's probably a good idea to heat shrink or tape the joints when you're done - they'll be very close together, possibly in danger of touching.
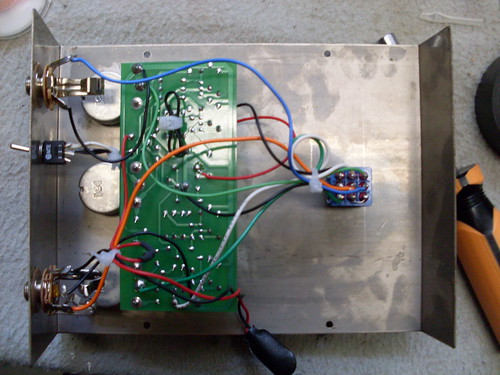
It should look something like this:
Once the switch is done you have to lift a couple of components: R5 and C8. They are both at the top of the board near the pots. They've been circled in this picture:
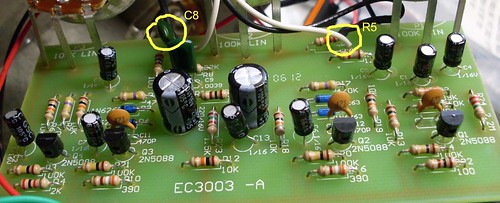
C8 is a little hard to see in the photo, but lift the leg on the far end of the board. R5's right leg should be lifted. Just heat up the joint on the bottom of the board and pull gently on the leg of the component with needle nose pliers from the other side to remove. Careful not to damage anything. After the parts are lifted, clean up the holes with desoldering braid.
Next: The leads from contact 1 of the switch need to be soldered into the holes from where the components were just lifted.
The leads from contact 2 go to the legs of the components themselves. I recommend using heat shrink on these joints.
Install the switch in it's new home, plug in and check to make sure everything's working, and then re-install the pots, knobs, etc and enjoy! It should look something like this:
The bypassed setting, in addition to having some more midrange, gives a big volume boost, which I like. I highly recommend doing this to any Reissue NY Big Muff!
Note that you can double click any of the photos below and it will take you to the Roadside Guitars Flickr where you can see larger pictures.
What you need:
-Wire
-Solder
-Desoldering Braid
-Soldering Iron
-Needle Nose Pliers
-Heat Shrink Tubing
-SPST toggle switch (SPDT will both work fine, one contact will just be left unused.)
What you have to do:
Open up the pedal casing, remove knobs and nuts on pot shafts and flip circuit board over.
Either drill a hole for a switch somewhere or remove the 9V power adapter jack on the rear of the pedal (that's what I did so I wouldn't have to drill. The jack isn't worth much to me anyway since I generally prefer battery power. A sub-miniature, and possibly even a miniature switch will fit there perfectly). If you use the hole from the jack, just coil the wiring up, zip tie it or tape it, and tape around the jack itself just to make certain it doesn't short anything. I cut the jack out and tied the remaining wire off, because I can use the jack as a replacement part on other pedals.
Wire Up the Switch: Solder two wires (I used 22 AWG stranded wire) to contact 1 and another two wires to contact 2. About 3 or 4 inches length is good. If you're using a sub-mini switch it's probably a good idea to heat shrink or tape the joints when you're done - they'll be very close together, possibly in danger of touching.
It should look something like this:
Once the switch is done you have to lift a couple of components: R5 and C8. They are both at the top of the board near the pots. They've been circled in this picture:
C8 is a little hard to see in the photo, but lift the leg on the far end of the board. R5's right leg should be lifted. Just heat up the joint on the bottom of the board and pull gently on the leg of the component with needle nose pliers from the other side to remove. Careful not to damage anything. After the parts are lifted, clean up the holes with desoldering braid.
Next: The leads from contact 1 of the switch need to be soldered into the holes from where the components were just lifted.
The leads from contact 2 go to the legs of the components themselves. I recommend using heat shrink on these joints.
Install the switch in it's new home, plug in and check to make sure everything's working, and then re-install the pots, knobs, etc and enjoy! It should look something like this:
The bypassed setting, in addition to having some more midrange, gives a big volume boost, which I like. I highly recommend doing this to any Reissue NY Big Muff!
Thursday, December 4, 2008
Just In Time For The Holdays

Jagermeister and Jetset Energy Ginger Ale together in plastic. I don't know whose idea this was, but I'd like to thank them from the bottom of my shriveled raisin of a heart that is close in color to the included liquor.
Wednesday, December 3, 2008
Guitar List
Throwing together a list of guitars we've worked on this past year:
Fender American Standard Telecaster
Fender American Ash Telecaster
Fender American Nashville B-Bender Telecaster
Fender Classic Series '72 Telecaster Thinline
Fender Classic Series '72 Telecaster Deluxe
Fender Deluxe Series Nashville Power Telecaster
Fender MIM Telecaster
Fender TC-90 Thinline
Fender American Standard Stratocaster
Fender American Stratocaster Hard Tail
Fender American Deluxe Fat Strat
Fender American Series Strat HH
Fender MIM Stratocaster
Fender MIM Fat Strat
Squier Affinity Series Stratocaster
Squier Bullet
Gibson Les Paul Standard
Gibson Les Paul Classic
Gibson Les Paul Studio
Gibson Les Paul Faded Special
Epiphone Les Paul Standard
Epiphone Les Paul Custom Black Beauty
Gibson Sonex 180 Deluxe
Gibson Invader
Gibson SG Standard
Gibson SG Faded Special
Epiphone G-400
Gibson Explorer
Gibson ES-335
Gibson ES-175
Rickenbacker 620
PRS McCarty
LTD Viper 400
Schecter Hellraiser C-1 FR
Dean Hollywood Z
Ibanez S620EXQM
Jay Turser JT-50
Fender American Standard Precision Bass
Fender MIJ '51 P-Bass RI
Squier Vintage Modified Precision Bass TB
Squier Affinity Series Precision Bass
Squier Bronco Bass
Fender American Standard Jazz Bass
Fender MIM Jazz Bass
Musicman Stingray
Ernie Ball Musicman Sterling
Gibson Ripper Bass
Some great, some not so great, and some I've come across too many times, ha. Hope to see this grow in the future.
Monday, December 1, 2008

Friday, November 21, 2008
First Post
Hey all,
This is the first post on our blog. We don't have any photos or anything to post right now, but rest assured, we will update very soon. Thanks for visiting, and in the mean time, you can check out our primary website www.roadsideguitars.com.
This is the first post on our blog. We don't have any photos or anything to post right now, but rest assured, we will update very soon. Thanks for visiting, and in the mean time, you can check out our primary website www.roadsideguitars.com.
Subscribe to:
Posts (Atom)
